The Assumption
I assume you already have a Hyper-V basic configuration on your system, be it a laptop, server or “other” with at least 1 client/guest VM running.
Whatever you have it running on, you are going to need to take a few additional, and very simple, steps to get your host and guest machines talking to each other.
I use this technique to setup demonstrations on my laptops and surface. I do this method rather than relying on the cloud because the cloud isn’t always there for me to be able to access, but my local VM usually is.
By no means is this the most ideal configuration, but it does the job for what I need it to do.
The Steps
There isn’t really much to be done. This is fairly straight forward and I know I was kicking myself after fighting for hours to get host and guest to communicate properly.
There are a few steps to follow to get a basic connection all setup so you can play with less frustrating aspects of your VM environment.
Here’s what you have to do:
1 – Create a New Virtual Network
Within the Hyper-V manager you will want to add a new virtual network to your host.
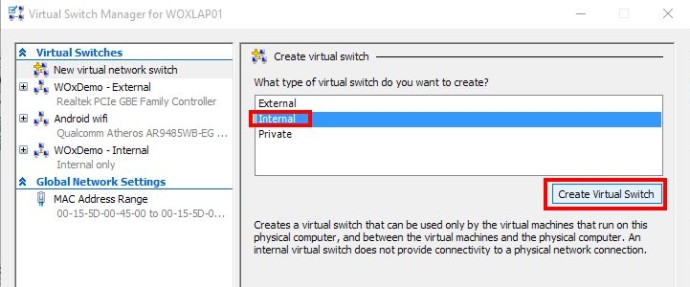
To do this look in the Actions pane on the right side of the window and select the Virtual Switch Manager.
Now you will want to select a new virtual network switch.
Select Internal and then click on the Create Virtual Switch button.

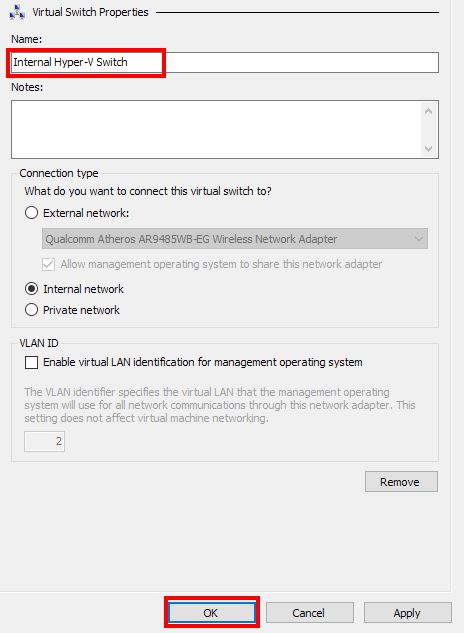
[divider]Create a name for this switch so you can easily identify it, and leave everything else as it was.
Click OK when done.

[divider]
2 – Configure the Host NIC
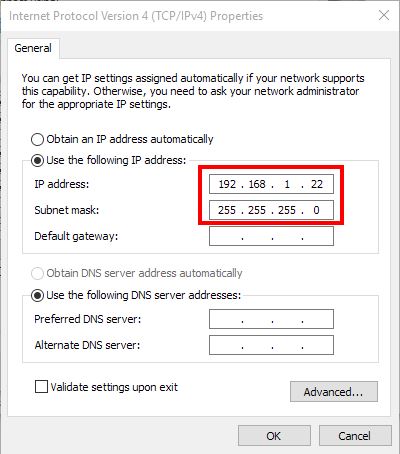
Once you have the new switch in place, you need to configure it on the host machine. There isn’t much to be done. Just add an IP and subnet and you are good to go. No really, that’s it. nothing else needs to be configured since this is looping internally.
In my example I use the following values. You can use the same, or whatever you like. The key is to set values you are not likely to ever use.
IP – 192.168.1.22
Subnet – 255.255.255.0
Here’s how the adapter settings looks when configured. You get to this by accessing the network connection and then the adapter settings for IPv4.

[divider]
3 – Add & Configure the New Guest NIC
Now you need to connect to the VM you setup and configure it’s network. To do this you need to shutdown the guest VM. Now modify the settings and Add New hardware a thte to pof the left panel. Select the internal network we created earlier and leave all the settings as they default. Once you have this added, you can restart the VM.
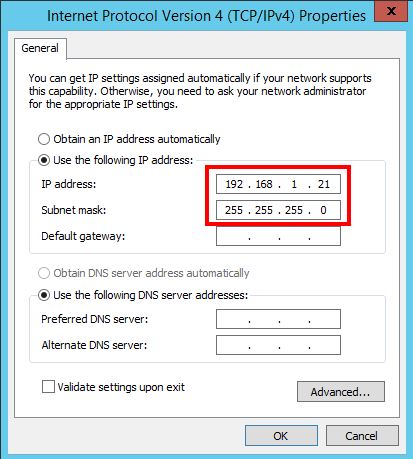
Once the server has restarted, you need to change the new network adapter to put it on the same subnet as you host machine earlier, but with a different IP address.

I used:
IP – 192.168.1.21
Subnet – 255.255.255.0
You will need to connect to the guest system to do this, but once connected it is the same process as above.
[divider]
4 – Test Access, RDP & SSMS
That’s it!
Now your guest and host systems should see each other allowing you to have a nice virtual test environment.
You can test with a remote connection, direct folder access and even SSMS.
I find it easier to connect vie the IP address, but you could play some and get the name to work, but that’s a different post.
*Don’t forget about your firewall settings!
This burned my in a live presentation for what felt like hours. A firewall on my guest system was re-activated and would not allow me to connect with SSMS for a live demo session. You want to make a couple of minute feel like hours, try troubleshooting a connection in front of a full room of people. I just turned the firewalls off and had no problems though it would be better to open only the ports you actually care about.
Now go and play with your virtualized test environment!

